Thursday 27 October 2016

Rendering

I have decided to try and bring my pool table to a high standard because I think it looks a little fake and it could be improved on.

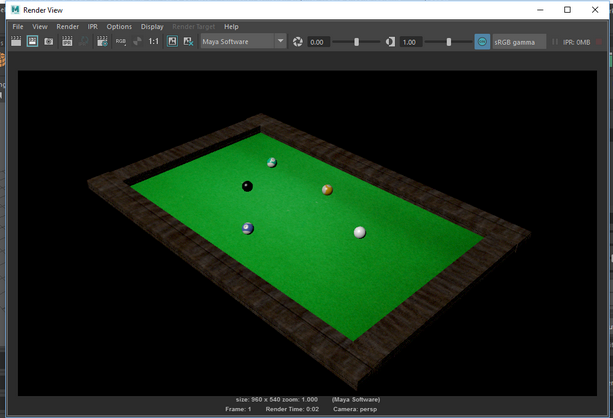
Here is a "before" rendering of the pool table.

In the before rendering I had already applied a Phong material to the pool balls, this gave them a shiny look and made them look a little more realistic. I wanted to improve this, so I tried to experiment with different lights. I found that a lot of the lights were too bright or too focused on a small point. In the end I used 3 area lights above the table in a row in line with the centre of the table. I found that this gave the table a realistic illumination. I also changed the texture of the wooden sides because I thought the current one didn't look too good. I also rotated the bump map to line it up more accurately with the grain on the wood texture to make it seem more believable rather than have the bump map apply grooves in the wood across the grain in the texture. I also turned down the intensity of the bump map because I thought it was a little too extreme.
After doing this I found that the pool balls were a little too reflective so I started adjusting the parameters of the material attributes of one of the pool balls and try to get it right, and then I would apply the setting to the rest of the pool balls to make them all look like the same material and keep it consistent. I changed the reflectivity to 0.049 because I found that a high reflectivity made them look like mirrors and it also gave them a strange effect making them look almost transparent.


I found that a reflectivity of 1.0 is too reflective


In order to make the rendering as high quality as possible, I turned on ray tracing and turned the edge anti-aliasing setting to be "Highest quality". These settings made the reflections visible by using a ray tracing method of rendering and also made the edges smoother by preventing any aliasing.


"After" Rendering

References
  • Software used: Autodesk Maya
Project Folder

Thursday 20 October 2016

Key Frame Animation

This week our task was to animate a model that we did in the other tasks. I chose to animate my mini golf model, I animated the windmill spinning, and also animated the ball, falling onto the floor and rolling through the windmill "tunnel" and into the hole.


This is a screenshot of my golf ball on frame one. It then falls onto the ground in frame 50, bounces and rolls through the tunnel into the hole. I did this by capturing a key frame of the ball first making impact with the ground, and then another one of it in the air and further along, and then another one again making impact with the ground, this gave me a bounce animation to make the ball look like it was skidding along the ground. I then added another key frame of the ball on the edge of the hole, so it would roll through the tunnel, and then another key frame of the ball at the bottom of the hole so it would drop into the hole.


I also animated my windmill to spin for the duration of the animation. I did this by combining the two "sails" of the windmill with the "axle" so I could rotate around the centre of the "axle". I added key frames every 60 frames of the animation incrementing the rotation by 180 degrees each key frame.

I also animated my camera to follow the ball through the tunnel and to the hole, and then zoom out into the sky.

References
  • Software used: Autodesk Maya
Project

Thursday 13 October 2016

Texturing


I started out by laying out the shapes that would make up a pool table with a few pool balls on it. I used a plane for the table surface and then added some spheres to the table and scaled them all to be 0.3 units. I also added sides to the table which I will texture with a wood image. I textured the table surface first with a green pool table texture on top of a Lambert material. 

I then decided to bump map the table surface in order to make it look more like a cloth and more realistic. A subtle 0.07 value of bump depth gives it a more realistic effect.


Textured [1] Before bump mapping


After bump mapping [2]


I then began to texture the pool balls, I would texture one, and then duplicate them and just change the map. I gave the pool balls a Phong material in order to make the pool balls look shiny.


I tried to experiment with the settings within the attributes editor in order to make the pool balls look realistic, I also adjusted the ambient light a little bit to try and help as well.


I then added textures to the sides of the pool table [4], I used a wood texture and applied a bump map to it as well. The wood didn't turn out as well as I hoped it would, I think the lighting made it look too bright and I'm not sure if the texture and the bump map work well together. To help the lighting issue on the wood, I turned down the diffuse value on the wood objects.


Final model

References
  • Software used: Autodesk Maya
  • [1] Table top texture: http://www.stemik.co.uk/shopimages/sections/thumbnails/green%20wool%207x7%20pool%20table%20cloth.jpg
  • [2] Cloth bump map: http://ftextures.com/textures/seamless-fabric-bump-map.jpg
  • [3] Wood bump map: http://community.coreldraw.com/cfs-file/__key/CommunityServer.Blogs.Components.WeblogFiles/coreldraw/3817.Planks_2D00_bump.jpg
  • [4] Wood texture: https://superdevresources.com/wp-content/uploads/2014/09/wood-textures.jpg
  • [5] 8 Ball texture: http://www.sharecg.com/images/original/16079.jpg
  • [6] 9 Ball texture: http://www.sharecg.com/images/medium/16080.jpg%3C/a%3E%3C/div%3E%3Cdiv%20class=
  • [7] 10 Ball texture: http://www.sharecg.com/images/medium/16081.jpg%3C/a%3E%3C/div%3E%3Cdiv%20class=
  • [8] 14 Ball texture: http://www.sharecg.com/images/medium/16085.jpg%3C/a%3E%3C/div%3E%3Cdiv%20class=
  • [9] 13 Ball texture: http://www.sharecg.com/images/medium/16084.jpg%3C/a%3E%3C/div%3E%3Cdiv%20class=
Project Folder

Tuesday 11 October 2016

Modelling


This week our task was to create a mini golf course, we did this by creating quite a flat rectangle and added a side to it which would be duplicated to be put onto the other side, this would form the basic shape of a hole of mini golf. I then added a sphere, made sure it was the same size on all 3 axes, and increased the subdivisions in order to make it as round a sphere as possible, this would create my golf ball.

The next task was to create a flag, I added the flag pole first in the form of a cylinder, and then added an actual flag. I added a rectangle to the pole and decided to change it to a triangle flag by reducing the amount of faces used to create the rectangle to one face, I could then manipulate the face which would change the whole shape, I compressed two points on the y axis in order to create a triangle. John showed us a way to animate the flag using physics to make it look more realistic. I did this but decided to go back to a rectangle flag. I then added a hole to the course. I did this by creating a cylinder and moving it to where I wanted my hole to be. I then clicked on my "ground" rectangle, held down shift on the keyboard and then clicked on the cylinder. I then clicked on the Mesh menu in the top of the screen and then selected Booleans and then selected the difference option in order to create a hole in the "ground" object that was the size of the cylinder.

I then tried to think of ideas of what more I could add to the model. I decided to add a windmill because it is a traditional mini golf feature. To do this I started with a cone, and then changed to vertex mode where I moved the peak of the cone to be level with the the edge of the circular base. I then added a cylinder to the centre of the windmill in order to hold the windmills "sails" which are made from a relatively flat rectangle, duplicated and then moved into position within the cylinder. I then used the same technique as I used to create the hole, to make a tunnel through the bottom of the windmill.

References
  • Software Used: Autodesk Maya
Project Folder